*****To thank Kristin of Bringing Pretty Back, for being our example blog for this tutorial we are giving her readers 10% all orders from now until October 31st! Just use the code PRETTY10 in your order form. Thanks pretty ladies!*****
Publishing on Blog*Spot is a super easy and FREE way to blog. But if you want your blog to feel more like a "website" you can maintain the ease of using Blogger without the blogspot.com in your URL. Blogger will continue to host all your content (post, widgets, followers etc) just like before, but your blog will be displayed with a new address.
(Unlike FTP publishing, which requires you to buy both a domain name and a hosting service.)
Today we will be talking about using Godaddy.com to transfer your blogspot.com to a .com.
Blogger does have an easier way to transfer domains. They do everything for you! All you have to do is purchase the domain. You can find a video tutorial on how to buy and transfer your domain with Blogger HERE.
So why would you want to even hassle with Godaddy if Blogger will do the transfer for you?
Well with Godaddy you have lots of other perks. Like setting up custom email addresses. You also have the freedom to use your newly purchased domain as a website if you so wish to in the future.
This tutorial consists of three parts.
Part 1:
Buying your domain name
Part 2:
Transferring your domain (blogspot.com to .com)
Part 3:
Blogger set up.
PART 1
The first thing you'll need to do is purchase your domain name.
Go to godaddy.com. On the main page search for a new domain name.
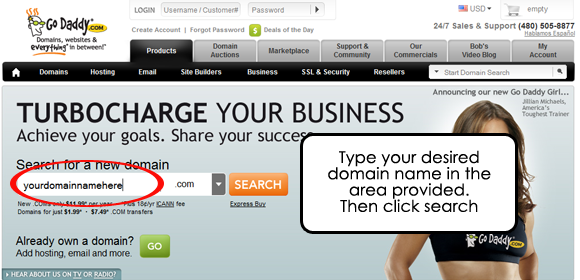
This step finds domains names that have not already been taken.
A new window will pop up with lots and lots of domain choices. You can choose anything from a .com to a .asia!
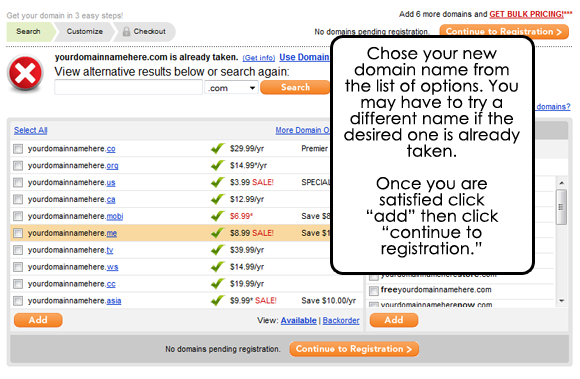
Once you've clicked "continue to registration" a window will pop up offering you multiple domain names. Click"no thanks."
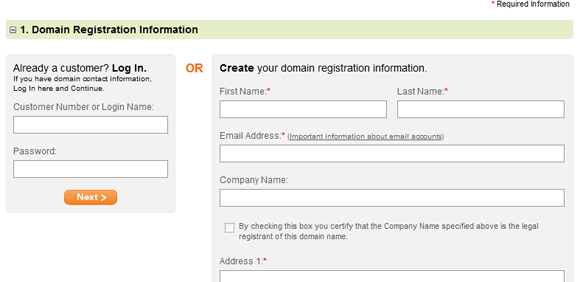
Then you'll have to fill out the Domain Registration Information form.
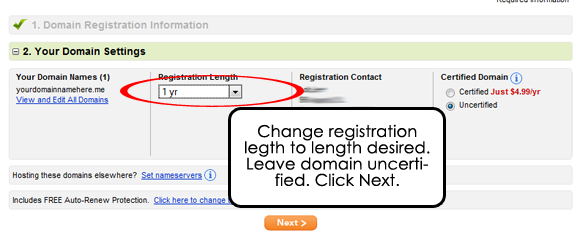
Then set your domain settings.
The next step is to chose your Privacy and Domain protection. Choose the package you'd like and click next. I just stick with the standard package.
Next you'll need to activate your domain.
Choose whether you want email addresses and web hosting. You may want to add custom email addresses but you WILL NOT need to buy web hosting. Click "Next".
Review your shopping cart and checkout.
PART 2
You will most likely be logged in to your Godaddy account and ready to do your domain transfer. But if you are not logged in, go to Godaddy.com and sign into your account using your Customer Number or Log In Name and password.
Now on to the fun stuff!!! The actual domain transfer!
We need to set up your DNS settings. DNS stands for Domain Name System, and a DNS server determines what site a given address takes you to. So far, you have a domain name but none of the servers on the internet know what to do with it yet. You'll need to do two things (1) create a CNAME and (2) create ANAMES so visitors who leave off the www won't see an error page.
First we have to create your CNAME alias.
1. In your account settings click "View In Domain Manager"
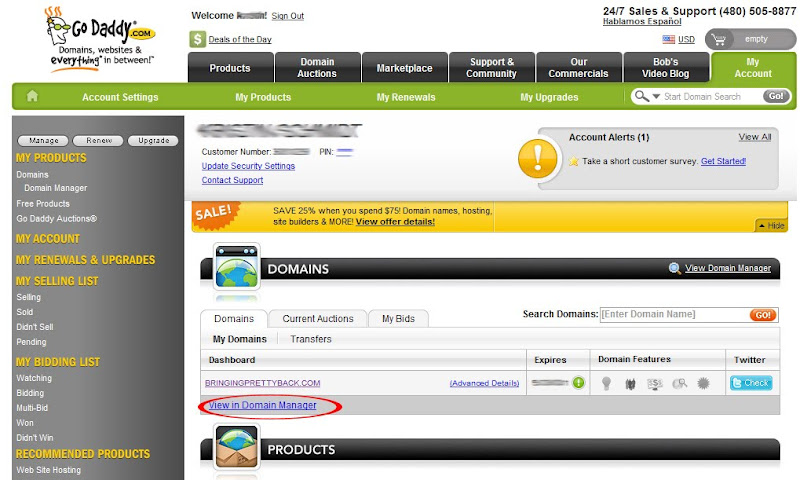
2. Click the name of the domain you want to transfer.

3. Click "Total DNS Control"

4. Click "Add New CNAME record"

5. In the new window enter www for alias name and enter ghs.google.com for host name.
Click ok, then ok again.

EDIT TO ADD:

If you get this error message after trying to create a new CNAME:
ERROR - Only one CNAME can exist for the hostname www
Your records will already contain a www CNAME. So you will need to click the pencil button out to the right and edit that name instead of creating a new one.
Now you need to set up the server A NAMES and IP numbers for your domain.
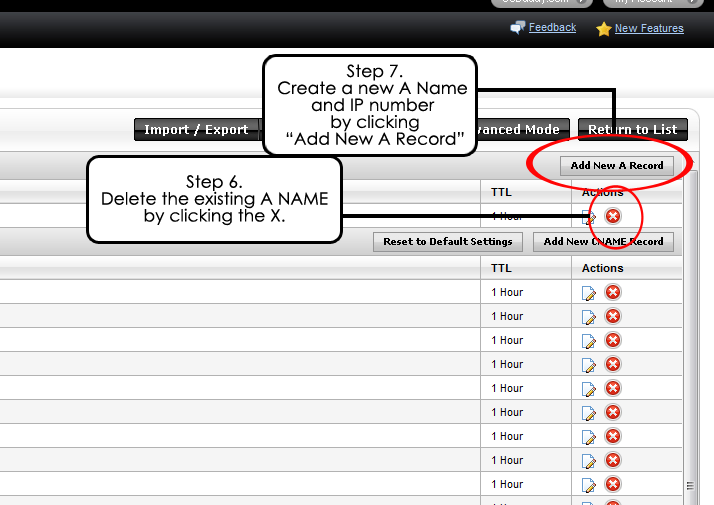
7. In the new window type your new domain name into the Host Name area without the www. in front.
Please Note: bringingprettyback.com NOT www.bringingprettyback.com
Type the first IP number in the second box. Click OK.

There are a total of four IP numbers. You will need to repeat step 7 for each of the four IP numbers!!
Those for numbers are:
Your DNS setup is now complete!!
PART 3
Hang in there!!!! You are almost done! Now you need to update your Blogger settings.
Log into your Blogger account. Under dashboard click "settings". Under settings click "publishing".
8. Click switch to: "Custom Domain"
Complete the word verification.
Then click "Save Settings"

9. Click "Switch to a advanced settings"

10. Type in your new domain name in the area provided.
Complete word verification.
Click "Save Settings."

DONE!
Now view your blog!
www.bringingprettyback.blogspot.com has become www.bringingprettyback.com

Now you have the benefits of a .com with the easy maintenance of a blogspot!
Sometimes it takes a few hours or even a day or so for the transfer to take place. Don't be nervous, it will happen! If you have any questions or concerns please feel free to email us at info@designerblogs.com and we will try and answer any questions you may have.
That wasn't so bad was it?!
Remember you can always have us DB girls transfer your domain for you, for a $30 fee. We currently only transfer blogs using godaddy.com domains, so keep that in mind if you want us to do your transfer.
And as always if you have any questions or ideas for future tutorials leave a comment here or email us at info@designerblogs.com
Happy Blogging!!


Girl, if you can get me through this, I will love you forever. I have tried and tried and tried, but to no avail. I am going to try one more time!
ReplyDeleteAfter Step 5, I get this error message:
ReplyDeleteERROR - Only one CNAME can exist for the hostname www
I continued following your instructions and ignored the error message. By gosh -- I think I've got it!!! I'm stunned. Do you realize how many hours I've spent on this? I will give you a huge shout out on my blog and I'm sending major cyber hugs to you. Is it really working? I'm stunned.
ReplyDeleteHi Jan! Thank you for bringing up a very good point that I forgot to address. If you already have a CNAME of www, you can simply click the pencil button out to the right and edit that CNAME instead of creating a whole new one. I will add that step to the tutorial!
ReplyDeleteI have worked with GoDaddy & Blogger for years & they are really easy to use together!
ReplyDeleteVisiting from SITS...
ReplyDeleteA blogger friend of mine recommended doing this very thing but I had no idea how to do it. Thank you for creating this tutorial. I hope to make the switchover soon, especially since I've heard of a lot of blogspot users whose content has disappeared.
Visiting from SITS Rooster Tribe!
ReplyDeleteI'm happy to connect with you!
Krizia
I am going to love your blog! Lots of great tips!
ReplyDeleteStopping by from the SITS tribe!
Oh my, a blog I get to learn from! Boy o boy!! This could be a challenge. =)
ReplyDeleteDropping in from the Lamby Tribe
~Mimi @ Woven by Words
Lauren, I've posted a little thank you note to you on my blog. I sure appreciate all you did to help me.
ReplyDeletewhere do the IP numbers come from? that has me stymied.
ReplyDeleteHi Terri! The IP numbers are supplied by Blogger help.
ReplyDeleteI actually recommend having someone like DB do it for you. I had mine done last year and so glad I did!
ReplyDeleteLauren, I did it! Thank you!
ReplyDeleteLove, Love, Love it Lauren... plus you made it sound so easy in clear English; no tech jargon. Thank you! I will keep you in mind when I'm ready to make the move... Pity you don't do Wordpress. I could use similar help there.
ReplyDeleteLooking forward to more chats!
I'm a Team Hare member and have subscribed and more.
Have a Happy weekend!
Elizabeth
great tutorial.
ReplyDeleteonly problem i have or maybe just a query...
When i add the ip adresses the host changes from my domain name to the "@" symbol.
Is this normal? nervous it isnt working!
@Sam -- be sure that your domain name is included (without the www.) before you click ok with each IP set up.
ReplyDeleteI just did it and my blog has disappeared, so I should just wait and not be nervous, right?! .. (:
ReplyDeleteOh phew... it's there. Boy that made me nervous for a sec. Thank you SO MUCH for this tutorial.
ReplyDelete@Erin -- I'm glad your blog didn't disappear. Sometimes it just takes a little bit to transfer. :)
ReplyDeletethank Lauren, I have a little question for you. Can you tell me if you know: Do I have to update feedburner in any way now that I have changed the address?
ReplyDelete@Erin -- Nope! If your readers still use your blogspot address or subscribed to that address they will be automatically redirected. :)
ReplyDeleteThank you for the tutorial. I do have a question. I followed the ANAME directions but when I check it with 3sunkissedboys.com instead of www.3sunkissedboys.com it doesn't come up. Also, even though I use 3sunkissedboys.com for the A host name, when I save it, it shows as @. Do you understand my question?
ReplyDelete@Yanet -- you must've gotten it to work since your comment. When I go to 3sunkissedboys.com without the www it works perfectly! Let me know if you have still having issues and I'll help you as best I can!!
ReplyDeleteDo you have a tutorial for domain.com?
ReplyDeleteThank you for sharing your efforts and saving all of us time!
ReplyDeleteDomain Registration Company Bangalore
Web Hosting Company Bangalore