


We thought it would be fun to start offering free tutorials for some of the questions we are commonly asked. If you have a question, feel free to leave it in a comment and we'll do our best to answer it for you in one of our upcoming tutorials.
I'm going to start off our first tutorial segment by sharing one of my favorite personal tricks with you. It's probably our #1 most commonly asked question. The question is: "How do I upload pictures to blogger in a larger size than the default blogger sizes?" Usually we explain to customer's the whole Photobucket method (we can share this method with you in a future tutorial if you are interested), but I'm here to tell you there is an easier way!!!
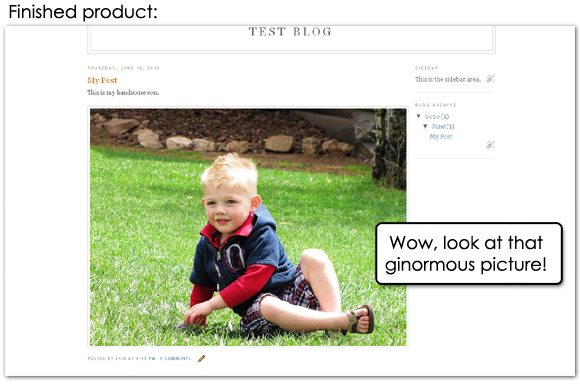
With this method, your pictures are hosted right through blogger (rather than a photo hosting site like photobucket), which means your readers can still click on each of your pictures to get a better look! It also takes only half the time because you don't have to resize your images before they are uploaded or have them hosted on a secondary site.
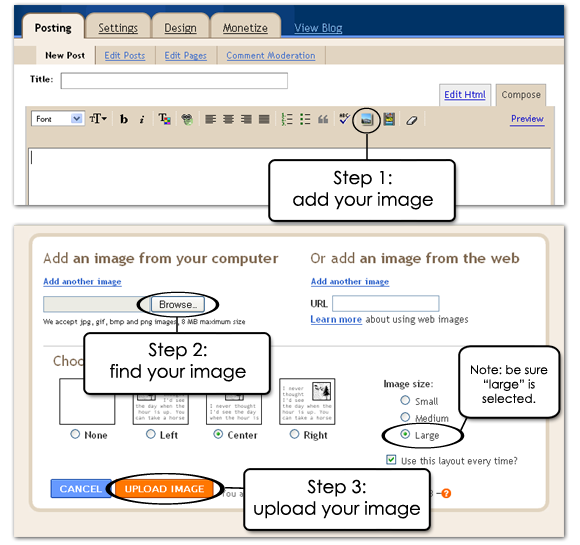
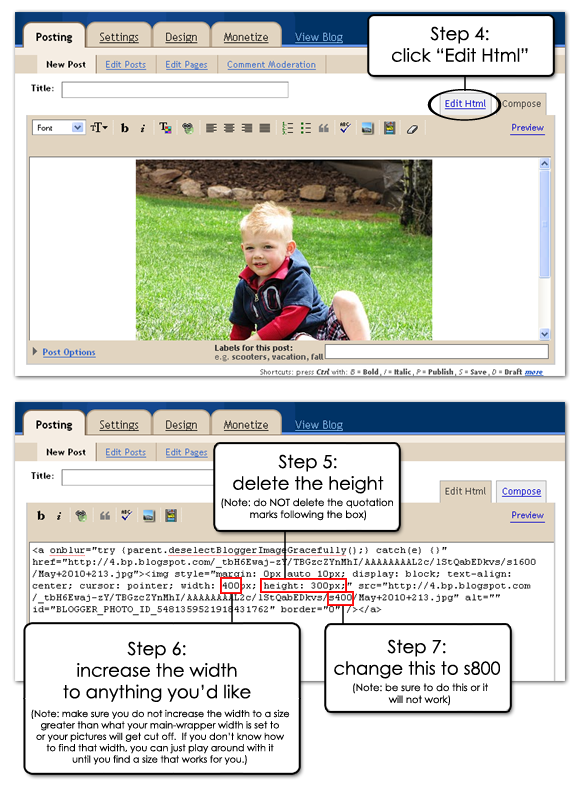
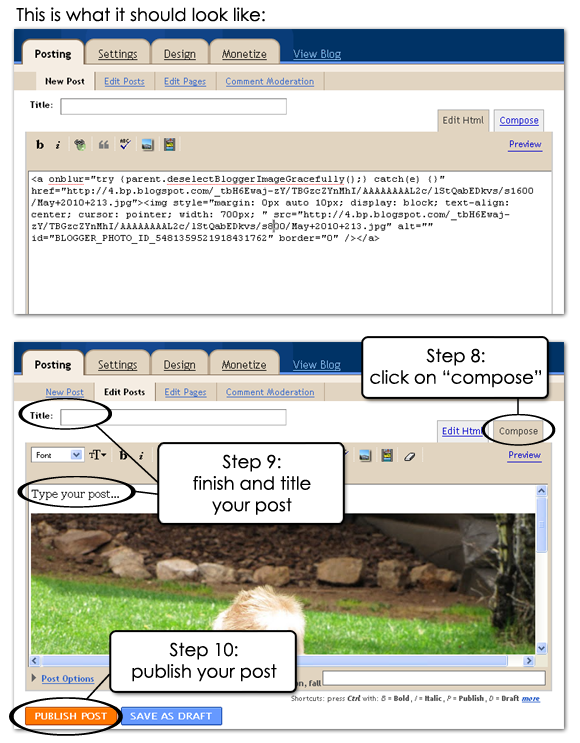
So here's what you do:
If you have any questions about this tutorial, feel free to leave them in a comment and we'll do our best to get them answered.
Also, have you noticed anything different about blogger?
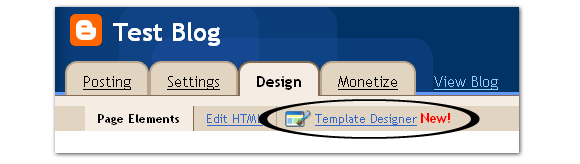
Look familiar?
Blogger now offers a great new way to super customize the look and layout of your blog without having to hire people like us to help you (sad for us, but great for you!). Some of our future tutorials will show you how these new features work and how they can best be used to help you get the look you want. Of course, to get an ultra fabulous fully customized blog, you'll still want to come and see us! :)
Happy blogging!

Happy blogging!


Thanks for the info! I have found I can't go beyond 540. Due to the fact that I have a three-column blog. Any more than that, and it doesn't show the entire photo.
ReplyDeleteHugs
SueAnn
Great post! Thank you. And I had noticed the new blogger feature, but didn't play with it...much. I look forward to definitely hearing more about what me, the nondesigner, can do!
ReplyDeleteI love this Erin. Thanks. This is really great info. I can't wait to hear more! Thanks for helping all of us that are not 1/2 as talented as you are! You rock!
ReplyDeleteI used to use photobucket until recently when I found out that the sites you can use to print your blog didn't support them. None of my pictures over the last year were imported so I found this method and have spent the last few days reloading my pictures on my blog so I can get it printed.
ReplyDeleteThanks so much for sharing, and I look forward to more tutorials!
If you use the updated editor (go to settings, then near the bottom of the page, select "Updated Editor") you can click on the photo, and click small, medium, large, or x-large. If that doesn't make scents, here is a tutorial: http://coffeeteaphotography.blogspot.com/2010/04/blogger-unwrapped-posting-large-images.html
ReplyDeleteThis way works well, unless you have a large, one column blog.
That's awesome, Erin! I have often wondered that, so I appreciate the tip that I will definitely be using!
ReplyDeleteThis is awesome!! I'm going to try this with my blog. I'm always wondering how to make the pictures look bigger. Thanks!!
ReplyDeletehttp://ragstostitchesboutique.blogspot.com
Great info!
ReplyDeleteGreat tutorial! Thank you. I had been fiddling with s1600 (cuz I read somewhere that would call up the original file size) and then adjusting the width and height and then I finally gave up and just tried a basic img src and a href combo.
ReplyDeleteBlech.
This tutorial came at just.the.right.time. Thank you!
Love your new blog and look, btw.
Thanks for the great tip. I'm going to give it a try. I was wondering if you could give a tutorial on how to make a scroll box for blog buttons?
ReplyDeleteThanks for the tutorial Designer Blogs! Just tried it and it worked perfectly! :) I'm following and will be sure to check back here for more.
ReplyDeleteWhat a great tutorial! This makes it veryvery clear. I wonder if you could show us how to increase the width of our header photos when we increase the width of our blog in the new template designer. Mine just stays the same size and is now left justified...
ReplyDeleteI've just found your blog. I love it.
I am so excited to try this. Thanks for posting it.
ReplyDeleteYou are a genius! Thank you for posting such easy to follow instructions. I have just increased the size of a heap of photos on my blog and they look f.a.n.t.a.s.t.i.c!
ReplyDeleteYOU ARE AMAZING!!!! These instructions were so clear and simple! Thank you!!
ReplyDeleteThis is super helpful, thanks!!
ReplyDeleteDo you know if there's a way to rotate images once you've inserted them into the post? Lately I've been having trouble in blogger, where the picture that I'm uploading turns out rotated the wrong way.
Thanks!